There’s a neat little trick that built into your Mac. You can sign your pdf document on mac using the ‘Preview’ application. It is a default app for opening photos and PDF files on Mac. The app makes the process of digitally signing documents easy. All you need to do is to create a signature and then insert it in a document.
Create Signature in Mac using Preview app
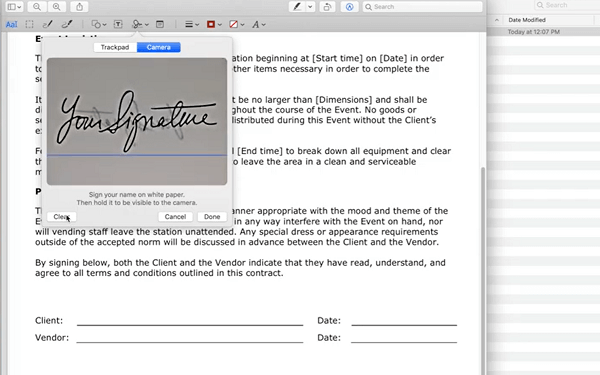
The first step is to create and add your signature to the Preview application. You can do this using three methods-
Using Trackpad – Use this method in case if you wish to write your signature using the Mac trackpad.Using Camera – Take a piece of paper and sign it. Now, take a snapshot of the same using the Preview app, it will digitize your signature automatically.Using an iPhone – You can also write your signature on your iPhone and then add it to the application.
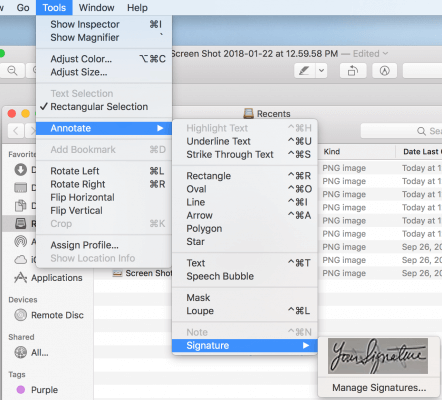
Once you have created a signature using one of the steps discussed above: Launch Preview app on your Mac and then head over to Tools > Annotate > Signature > Manage Signatures > Create Signature > Camera.
Insert Signature to PDF using Preview app in Mac
Once the signature is added, you can use this to sign all of your PDF documents within a minute. The steps to sign the document are as follows: Open the PDF document in the Preview app and then go to Tools > Annotate > Signature. Here, you will get a list of all the signatures that you have created. Select one that you want to add to the PDF document. And Tada! You will have your document signed in no time. It also allows you to drag the signature around on the paper and resize it. This is one of the most simple and effective methods to sign a PDF document on Mac. The best part is that saves you from the hassle of printing documents which are not going to be used later. Do let us know if this helped you simply your workspace. Till then, cheers!